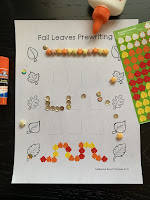
This series is a set of blogs intended to offer ideas about how to get more use out of your packs. While most activities are typically self-explanatory or include simple instructions, there are a variety of ways some of the activities can be approached. By mixing up the way the activities are done, it can reinforce concepts and help hone skills. It also means that the same activity can be repeated with a different way to increase the amount of use you can get out of a single pack providing you with more bang for your buck.
Prewriting Practice
One of my favorite activities to include in my packs is prewriting practice. It's a basic skill for students just learning to handle and control a writing implement. It involves more control than coloring by requiring the tracing of a dotted line. The lines are typically a mix of straight, slanted, and curved lines. Though the activity seems simple and straightforward, there are a number of ways to complete the activity that can hone skills, introduce new ones, and keep some simple activities interesting for students.
Below I've described a number of different ways this activity can be done so you can get more life out of the same activity within a pack or an activity that is repeated in different packs you may own.
Laminate for future use
One of my most common recommendations is to laminate some of the activities for future use. While prewriting activities seem like a simple trace and toss activity, they can often be laminated. Students can use a dry or wet erase marker to complete the activity. It can then be wiped down and used for the same student, a different student, and saved for subsequent years. This is a great option for holiday and seasonal activities as they have a limited amount of time they can be used in the classroom, so it's handy to save the paper and get multiple uses out of the same pages.
Incorporate various writing utensilsStart very young students with easier to hold instruments like wide crayons or markers. They can then work their way to using thinner more detailed utensils like colored pencils, thin markers, or pens.
As a bonus tip, try having students watercolors to trace the lines.
Bonus tip 2: keep this activity interesting by incorporating color, selecting a few to use throughout the activity - this is especially fun for seasonal activities.
Take advantage of other fine motor approaches
A simple tracing activity can become a base for other fine motor activities. Provide students with manipulatives to line up with the dotted line. Use craft sticks, tooth picks, chenille sticks, or string and have students match the smaller items up with the lines.
Practice glue skillsHave students place a glue line to glue ribbon or string to the lines. Provide small beads, decorative scatter pieces, confetti, sequins, or other small items that can be pasted along the line. A glue stick may also be used for this option if you are using something lighter like tissue paper squares or string. For less mess, provide self adhesive stickers to stick along the line.
Increase the difficulty
A great way to save paper and enhance the skill level is to increase the difficulty by printing the activity at a smaller size. This means more focus and control are needed to trace the lines at half the size or smaller.
I hope these ideas have given you inspiration to get more out of this great activity. Let me know if you've tried them or if you have other ideas for ways you've used these activities! Keep checking back for more ideas for other pages included in my prek packs!
Candy Corn PreK Pack
Apple PreK Pack
Fall Leaves PreK (No Prep, Printer Friendly) Pack
Pumpkin PreK Pack


No comments:
Post a Comment